Homebrewing is a lot like baking from scratch. It can be like those red velvet cupcakes that are so good that Grandma always asks you to bring them to Thanksgiving, but mostly it’s those chocolate chip cookies you make right after your 6 p.m. organic chemistry test. Rarely, it can be like those “peanut butter bars” that were really just lumps of burnt sugar.
Either way, at the end of the day, pride tells you they taste at least pretty good, that you spent so long working on those cookies you should eat them, and you’d really rather just eat them then go spend ten bucks on professionally made cookies.
You will feel exactly the same way with homemade booze. It can be frustrating, dirty, and it takes a decent amount of time. But when you open that first bottle of beer or wine, you will love it and cherish it because you spent the last five weeks bonding with said nectar of the gods.
This isn’t supposed to be a step by step guide, but an introduction to show how a complicated process is easy enough to do in a college student’s apartment.
The Basics
Fermenting alcohol needs two things: sugar and yeast. When the yeast Saccharomyces cerevisiae eats sugar, it makes carbon dioxide and ethanol. In nature, this all happens on that white stuff you sometimes find on grapes. But in a sealed off glass container with lots of water, you get booze. In essence, brewing is caring for a container of yeast, kind of like a fun version of a Chia pet.
Every type of yeast is different. While the types you will use will make ethanol, all of the different little sub-species make their own special chemicals that lead to unique flavors. The yeast used in making hefeweizens is famous because it makes esters that leave a hint of bubblegum or clovers, while the yeast Brettanomyces is well known for spoiling wine and beers with phenolic compounds, but when controlled makes another compound that tastes like bacon.
Buyable yeast comes in two main ways: little packets of dry yeast like you would use for making bread, or yeast that you can pour in like a liquid. Each packet is enough for good fermentation of a five gallon (48 12-ounce bottles) batch of beer, cider or wine. You’ll be able to buy for exactly the type of yeast you need for whatever it is you decide to make.
Equipment
If there’s a catch to making your own alcohol, it has to be the equipment. The more devoted and scientific you get, the more crazy specific and expensive the stuff gets until you’re basically running a brewery out of your garage.
For your first time, it’s not that bad. All you need is a container to hold all of your liquid, a way to keep nasty bacteria from getting in your precious booze and a way to move it around. In beer making terms, that looks like this:
•A glass carboy for fermentation
•A giant pot for boiling
•A bung and airlock to seal your carboy
•A siphon to move your wort and beer around
Oh yeah, and sanitizer. Lots and lots of sanitizer. Like piles of sanitizer. Because you are going to be spending a ton of time cleaning all of your equipment off, because if any little bacteria gets in your sugar juice, anything you make is going to smell and taste nasty (and maybe poison you depending on the bacteria).
Cider and Wine
We’re going to start simple. Cider and wines are basically fermented fruit juice. Pretty much every fruit juice is stocked full of sugar that requires no additional boiling, cooking or chemicals needed for the yeast to eat it. The reason you don’t see much alcohol made from things besides apples and grapes is that they taste terrible.
A simple recipe for an Apfelwein (like a German version of cider) goes like this: “Pour five gallons of apple juice into a five gallon glass fermenter, and then pour in a packet of champagne yeast and wait five weeks.” It’s seriously that easy. Wine is essentially the same, but replace apple juice with grape juice.
Beer
Beer is more difficult because it is made of grain malt, and the sugars in grain won’t come out unless you boil them out. And beer also needs hops for bitterness or else it would taste like Frosted Flakes in soda water.
For beer, advanced brewers will use something called mashing, where you put your malt in hot water and the water absorbs a lot of the sugars. This liquid, wort, gets separated from the grain and used as sugar juice to put yeast in. And it only gets way more complicated than that (because biology and proteins and water solubility and other not fun things).
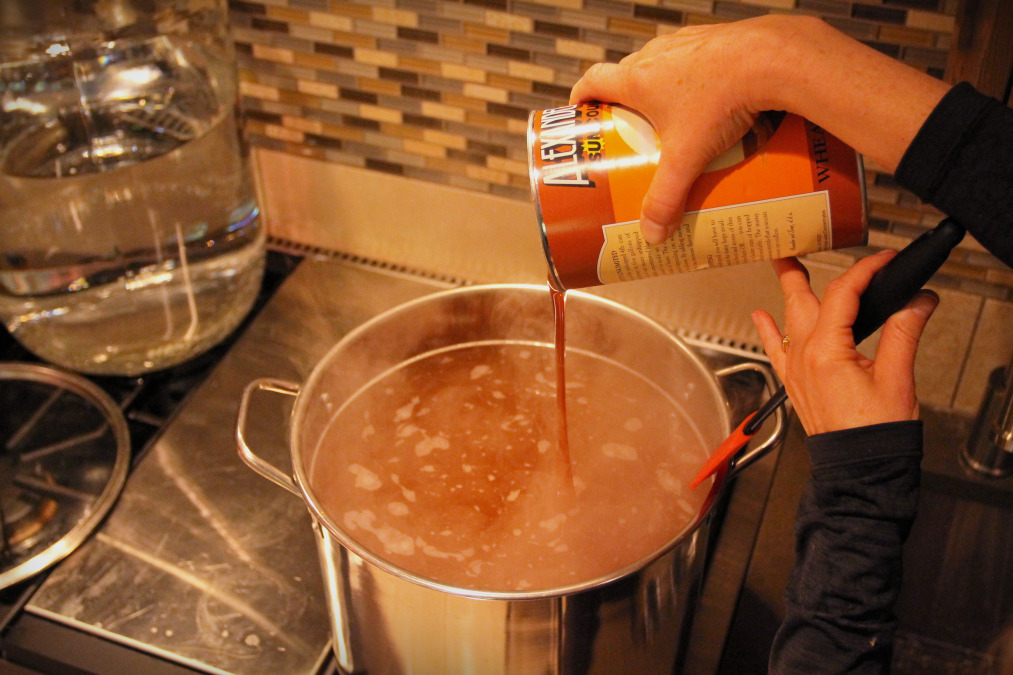
Luckily for you, companies take malted grains and turn all the sugars into a can of syrup. Then you put the syrup in hot water and get wort (what brewers call the sugar water).
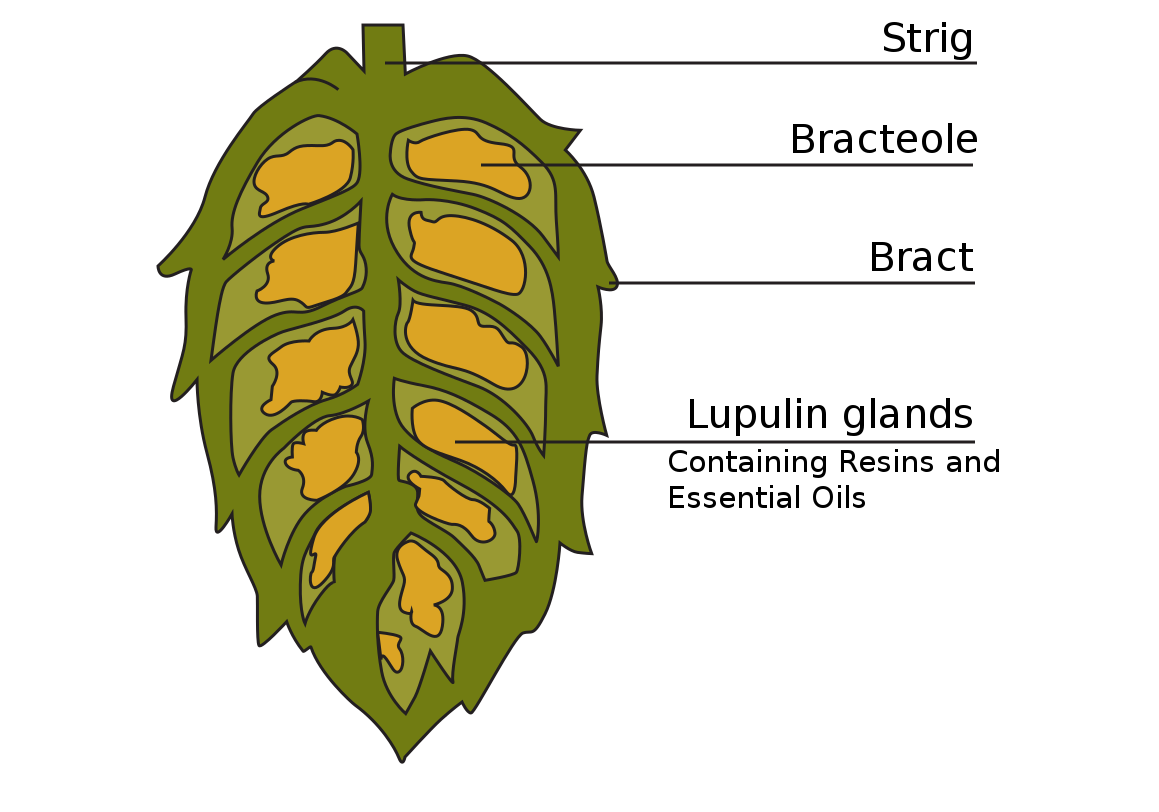
Hops add another level of complexity. Hops are tiny flowers, distantly related to marijuana, that grow on vines and hold special types of oils. When you boil these oils, some turn into compounds that taste bitter (to balance the sugar water), and other flavors ranging from spicy to floral. When you don’t boil these oils, they give the ‘hoppy’ taste in IPAs.
To make beer super easy, companies and brew shops make “style packs.” A hefeweizen pack will have wheat malt syrup, the right hops, and instructions. You can finish brewing a batch of beer in an hour and a half.
Bottling
The last step in any batch of homebrew is bottling. Wines can be siphoned off into bottles and shoved in a cellar with no worries. Beer and cider need to be packaged with a little bit of extra sugar, which in the closed off bottle carbonates your beer, because flat beer tastes pretty nasty.
Every beer style has its own amount of carbonation, and hence its own amount of sugar you need to put in, but most recipes and brewing packs come will tell you exactly how much.
You can reuse beer bottles you yourself empty, or you can buy new ones online. New bottle caps are easy enough to find at brew shops. The worst part of bottling is washing and then sanitizing all of your bottles.
Tips
Go to homebrewtalk.com and learn. These people have all made the same mistakes you might make or have made and know how to fix them. There are great recipes and great advice all over the site.
Sanitize, sanitize, and sanitize.
Visit BrewCamp, the homebrewing shop that opened up in Evanston recently. The guys that work there know their stuff, and they offer lessons too.
Sanitize.
Dillo Day is seven weeks away, which is coincidentally about the time it will take to ferment and carbonate a batch of beer. Get on it.